 Sho
Sho5. Spring Boot: Creating Your First Application
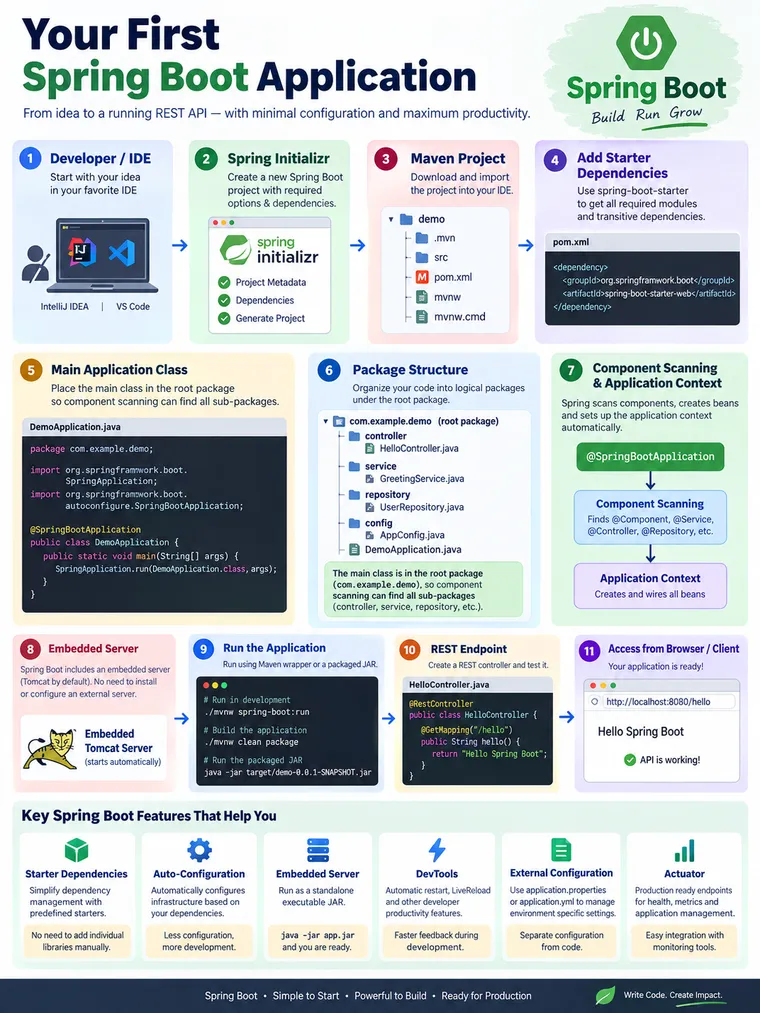
Spring Boot: Creating and Running Your First Application
Short Description:
Learn how to create your first Spring Boot application from scratch, understand the generated project structure, add dependencies, organize packages, run the application, and expose your first REST API. This tutorial also connects the development workflow with the Spring Boot features we discussed earlier, including Starter Dependencies, Auto-Configuration, Embedded Server, DevTools, Externalized Configuration, and Actuator.
Spring Boot: Creating Your First Application
In the previous articles, we focused on an important question:
Why was Spring Boot created in the first place?
We discussed how Spring Boot reduces repetitive configuration and makes it easier to build, run, and operate Spring applications.
We explored:
- Starter Dependencies
- Auto-Configuration
- Embedded Server
- DevTools
- Externalized Configuration
- Actuator
Now it is time to connect those concepts to an actual application.
Instead of discussing Spring Boot only as a concept, let’s build a small application and see what happens from the moment we create the project until we access our first REST endpoint.
The goal of this tutorial is not simply to create a "Hello World" application.
The goal is to understand:
What did Spring Boot create for us, why is the project structured this way, and which Spring Boot features are working behind the scenes?
1. What Are We Going to Build?
We will create a simple Spring Boot REST application.
Our final flow will look like this:
Developer ↓Spring Initializr ↓Spring Boot Project ↓Maven Dependencies ↓Main Application Class ↓Spring Application Context ↓Auto-Configuration ↓Embedded Web Server ↓REST Controller ↓HTTP Request ↓HTTP ResponseBy the end, we should be able to run something similar to:
http://localhost:8080/helloand receive:
Hello Spring Boot2. What Do We Need?
Before creating the application, we need a basic development environment.
Typically:
- JDK
- IDE
- Maven or Gradle
- Internet connection for downloading dependencies
Popular IDE choices include:
- IntelliJ IDEA
- Eclipse
- Spring Tools
- Visual Studio Code
The exact IDE is not important.
The important part is that the IDE can work with Java and the selected build system.
3. Create the Project Using Spring Initializr
One of the easiest ways to create a Spring Boot application is Spring Initializr.
Instead of manually creating:
pom.xmlsrc/main/javasrc/main/resourcessrc/test/javaand individually deciding which dependencies are required, Spring Initializr generates the initial project structure for us.
Conceptually:
Project Requirements ↓Spring Initializr ↓Project Metadata ↓Required Dependencies ↓Generated ProjectFor a simple REST application, typical choices are:
Project → MavenLanguage → JavaPackaging → JarJava Version → Supported JDK versionDependency → Spring WebYou can also provide project metadata such as:
Group → com.exampleArtifact → demoName → demoPackage → com.example.demo4. Why Maven?
Maven is not a Spring Boot feature itself.
It is a build and dependency management tool.
Maven helps us manage:
- dependencies
- dependency versions
- compilation
- testing
- packaging
- plugins
- build lifecycle
For example:
pom.xml │ ├── Project metadata ├── Dependencies ├── Plugins └── Build configurationSpring Boot integrates very well with Maven, but Spring Boot can also be used with Gradle.
So remember:
Spring Boot is the application framework/platform; Maven or Gradle manages the build.
5. Understanding the Generated Project
After generating the application, you will typically see a structure similar to:
demo/│├── .mvn/│├── src/│ ├── main/│ │ ├── java/│ │ │ └── com/example/demo/│ │ │ └── DemoApplication.java│ │ ││ │ └── resources/│ │ └── application.properties│ ││ └── test/│ └── java/│├── pom.xml├── mvnw└── mvnw.cmdLet’s understand why these files exist.
6. src/main/java
This is where the application’s Java source code lives.
For example:
src/main/java │ └── com.example.demo │ ├── controller ├── service ├── repository └── DemoApplication.javaAs the application grows, we organize related classes into packages.
For example:
com.example.demo│├── controller│├── service│├── repository│├── configuration└── DemoApplication.javaThis gives the project a clear structure.
7. Why Package Structure Matters
This is more important than it initially appears.
Spring Boot’s component scanning needs to know where to look for application components.
Consider:
com.example.demo│├── DemoApplication.java│├── controller│ └── OrderController.java│├── service│ └── OrderService.java│└── repository └── OrderRepository.javaIf the main application class is in:
package com.example.demo;Spring Boot’s component scanning can discover components in packages underneath that package.
Conceptually:
com.example.demo │ ├── controller ├── service ├── repository └── configuration ↑ Component scanningThis is why placing the main application class in an appropriate root package is a useful convention.
8. The Main Application Class
Spring Initializr creates a main application class similar to:
package com.example.demo;
import org.springframework.boot.SpringApplication;import org.springframework.boot.autoconfigure.SpringBootApplication;
@SpringBootApplicationpublic class DemoApplication {
    public static void main(String[] args) {        SpringApplication.run(DemoApplication.class, args);    }}
At first glance, this looks very small.
But a lot happens when this method executes.
9. What Does @SpringBootApplication Mean?
This annotation is one of the most important parts of a Spring Boot application.
At a conceptual level, it combines three major capabilities:
@SpringBootApplication │ ├── Configuration │ ├── Component Scanning │ └── Auto-ConfigurationSo instead of writing several configuration annotations separately, Spring Boot provides a convenient application-level annotation.
This is one of the examples of the principle we discussed earlier:
Spring Boot prefers sensible conventions for common application setup.
10. Component Scanning
Suppose we create:
@RestControllerpublic class HelloController {}How does Spring know that this class should become part of the application?
Component scanning.
Spring scans the relevant packages and looks for Spring-managed components such as:
@Component@Service@Repository@Controller@RestController@ConfigurationWhen it finds them, Spring can register them with the application context.
Conceptually:
Application starts ↓Component scanning ↓Find Spring components ↓Create/register beans ↓ApplicationContextThis is why package organization matters.
11. Create Our First REST Controller
Now let’s create a simple controller.
package com.example.demo.controller;
import org.springframework.web.bind.annotation.GetMapping;import org.springframework.web.bind.annotation.RestController;
@RestControllerpublic class HelloController {
    @GetMapping("/hello")    public String hello() {        return "Hello Spring Boot";    }}
That’s enough to expose our first endpoint.
12. What Does @RestController Do?
@RestController tells Spring that this class is responsible for handling web requests and returning response data directly.
For example:
@RestControllerpublic class HelloController {}The class becomes a Spring-managed web component.
Then:
@GetMapping("/hello")maps an HTTP GET request to the Java method.
So:
GET /hello ↓HelloController ↓hello() ↓"Hello Spring Boot"13. Where Did the Web Server Come From?
This is where our earlier discussion about Embedded Servers becomes real.
We didn’t install Tomcat separately.
We didn’t manually configure a servlet container.
We didn’t create a WAR file and copy it into an external server.
Instead, Spring Boot can run the application with an embedded web server.
Conceptually:
Spring Boot Application │ ├── Application Context │ ├── REST Controller │ └── Embedded Web Server │ ↓ HTTP :8080When the application starts, the embedded server starts as part of the application lifecycle.
This is one of the reasons Spring Boot applications can commonly be packaged as executable JARs.
14. Where Did the Server Dependency Come From?
This is where Starter Dependencies become useful.
For a web application, we typically add the appropriate Spring Boot web starter.
For example:
<dependency> <groupId>org.springframework.boot</groupId> <artifactId>spring-boot-starter-web</artifactId></dependency>The exact starter depends on what your application needs.
The important concept is:
spring-boot-starter-web │ ├── Spring Web capabilities ├── Spring MVC infrastructure ├── JSON/web-related dependencies └── Required supporting dependenciesSpring Boot’s dependency management then helps keep the versions of the managed libraries compatible.
This is what we discussed in the previous article:
A starter simplifies dependency selection; it does not itself perform auto-configuration.
15. Starter Dependency vs Auto-Configuration
This distinction is worth repeating because it is fundamental.
Starter Dependency
Answers:
“What libraries do I need?”
Auto-Configuration
Answers:
“How should common infrastructure be configured?”
So:
Starter ↓Dependencies available ↓Spring Boot detects application setup ↓Auto-Configuration ↓Infrastructure configuredThis is one of the central ideas behind Spring Boot.
16. What Happens When SpringApplication.run() Executes?
Now let’s look at the application startup process.
We have:
SpringApplication.run(DemoApplication.class, args);A simplified startup flow is:
main() ↓SpringApplication.run() ↓Create/prepare ApplicationContext ↓Read configuration ↓Component scanning ↓Apply auto-configuration ↓Create required beans ↓Start embedded web server ↓Application readyThis is a simplified model, but it gives us the right mental picture.
There are many more details internally, but these are the major stages to understand initially.
17. Where Does Auto-Configuration Help?
Suppose Spring Boot detects that our application is a web application.
Based on the available dependencies and configuration, Spring Boot can automatically configure common infrastructure.
Instead of manually configuring every component, Boot applies conditional configuration.
Conceptually:
What is on the classpath? +What configuration is present? +What beans already exist? ↓Spring Boot Auto-Configuration ↓Configure appropriate infrastructureThis connects directly to the second article in our series.
18. application.properties
The generated application also commonly contains:
src/main/resources/application.propertiesThis is where application configuration can be externalized.
For example:
server.port=8081Now the application can listen on:
http://localhost:8081instead of the default port.
This demonstrates another Spring Boot feature we discussed earlier:
Configuration can be separated from application code.
Instead of writing:
server.start(8081);we can keep the setting outside our business code.
19. Why Externalized Configuration Matters to Teams
Consider three environments:
Development → 8081Testing → 8082Production → 8080The application code doesn’t need to change simply because the environment changes.
Similarly, configuration can represent things such as:
Database URLDatabase credentialsServer portLogging levelFeature flagsExternal service URLsThe exact mechanism can evolve into environment variables, configuration files, secret stores, and platform configuration as the application becomes more mature.
The key principle remains:
Application behavior and environment-specific configuration should not be unnecessarily hard-coded together.
20. Run the Application from the IDE
Most modern IDEs allow you to run:
public static void main(String[] args)directly.
When you run DemoApplication, Spring Boot starts the application.
The console will show startup information and eventually indicate that the application is ready to accept requests.
The exact startup output varies by Spring Boot version and configuration, so focus on the important outcome:
Application started ↓Web server running ↓Application ready21. Run Using Maven
You can also run the application from the command line.
For Maven projects, the Spring Boot Maven plugin provides a convenient development command:
./mvnw spring-boot:runOn Windows:
mvnw.cmd spring-boot:runIf Maven is installed globally, you can also use:
mvn spring-boot:runThe Maven Wrapper is useful because it allows the project to invoke the expected Maven version without requiring every developer to manually install and manage that exact version.
22. Package the Application
Now suppose development is complete and we want to create an application artifact.
Run:
./mvnw clean packageMaven performs the build lifecycle and produces an artifact under:
target/For example:
target/└── demo-0.0.1-SNAPSHOT.jarThe exact filename depends on your project metadata.
23. Run the Packaged JAR
Once the application has been packaged, we can run it with:
java -jar target/demo-0.0.1-SNAPSHOT.jarThe flow is now:
Source Code ↓Maven Build ↓Executable JAR ↓java -jar ↓Spring Boot starts ↓Embedded Server starts ↓REST API availableThis is one of the most important differences between simply writing Java code and building a deployable Spring Boot application.
24. Test the REST API
Once the application is running, open:
http://localhost:8080/helloOr use a tool such as:
curl http://localhost:8080/helloThe response should be:
Hello Spring BootOur first Spring Boot application is now running.
25. What Actually Happened?
It may look like we only wrote a few lines of code.
But behind those lines, several Spring Boot capabilities participated.
Your Application │ ▼ @SpringBootApplication │ ┌────────────┼────────────┐ ▼ ▼ ▼ Component Auto-Config Configuration Scanning │ │ │ └────────────┼────────────┘ ▼ ApplicationContext │ ▼ Embedded Web Server │ ▼ REST Controller │ ▼ HTTP ResponseThis is why understanding the framework is more valuable than simply memorizing annotations.
26. How the Previous Six Features Helped Us
Now let’s connect this application with everything we learned earlier.
1. Starter Dependencies
Instead of manually identifying every library required for the web stack:
Spring WebJSON supportServlet infrastructureServer dependenciesSupporting librarieswe select the appropriate starter.
Starter ↓Required dependency set ↓Faster project setupTeam benefit
Every developer starts with a consistent dependency setup.
27. Auto-Configuration
Once the required dependencies are present, Spring Boot can automatically configure common infrastructure based on the application’s classpath, configuration, and existing beans.
Instead of manually creating every infrastructure bean:
Dependencies ↓Conditions ↓Auto-Configuration ↓BeansTeam benefit
Developers spend more time implementing application behavior and less time repeatedly wiring common infrastructure.
28. Embedded Server
We don’t need a separately installed application server just to run a typical Spring Boot web application.
Application +Embedded Server ↓Executable JARTeam benefit
The development and deployment process becomes simpler and more consistent.
29. DevTools
During development, DevTools can reduce the friction caused by repeated code changes and application restarts.
Change code ↓DevTools detects change ↓Fast restart / development feedback ↓Test againTeam benefit
A faster feedback cycle can make local development more productive, especially when developers are making frequent changes.
30. Externalized Configuration
Configuration can live outside the Java source code.
Application Code +Environment ConfigurationFor example:
server.port=8081Team benefit
The same application artifact can be promoted across environments while environment-specific values are supplied separately.
31. Actuator
Actuator becomes particularly valuable as the application moves toward testing and production.
For example, the team may want information about:
Is the application healthy?Are metrics available?Are application components responding?What operational information is exposed?Actuator provides production-oriented management and monitoring capabilities that can integrate with a broader observability setup.
Team benefit
Developers, QA, platform teams, and operations/SRE teams can obtain useful runtime information without every team independently building the same basic management endpoints.
32. The Developer Journey
We can now see why these features were introduced.
Without the Spring Boot approach, developers could spend considerable effort on repetitive infrastructure tasks:
Configure build ↓Choose dependencies ↓Manage versions ↓Configure framework ↓Configure server ↓Deploy application ↓Add operational endpoints ↓Repeat for another projectSpring Boot moves many common tasks toward:
Create project ↓Select dependencies ↓Write application code ↓Run ↓Package ↓DeployIt doesn’t remove engineering complexity altogether.
Instead, it standardizes and simplifies the common path.
33. A Small Project Today Can Become a Large System Tomorrow
Our application currently contains:
HelloControllerBut a real application may eventually become:
com.example.orders│├── controller││ ├── OrderController│ └── CustomerController│├── service││ ├── OrderService│ └── CustomerService│├── repository││ ├── OrderRepository│ └── CustomerRepository│├── model│├── configuration│└── OrdersApplicationThe same Spring Boot fundamentals continue to apply.
That’s why understanding the first application is important.
You are learning the foundation for much larger systems.
34. What If We Put the Controller in the Wrong Package?
Suppose the main class is:
com.example.demo.DemoApplicationbut the controller is accidentally placed under:
org.example.controllerThe default component scanning may not discover it.
You could then see a situation where:
Application starts successfully ↓But /hello does not workThis is a useful example of why understanding the underlying mechanism matters.
It isn’t enough to know:
“Add
@RestController.”
You should also understand:
“How does Spring discover this controller?”
35. Common Beginner Mistakes
Mistake 1: Putting classes outside the component-scan area
Keep the main application class in a sensible root package.
Mistake 2: Forgetting the correct dependency
A REST application needs the appropriate web dependencies.
If the required web stack isn’t present, Spring Boot cannot magically provide it.
Mistake 3: Changing the port but testing the old URL
If:
server.port=8081then test:
http://localhost:8081/hellonot:
http://localhost:8080/helloMistake 4: Thinking Spring Boot hides everything
Spring Boot simplifies configuration, but the underlying Spring Framework is still doing the important work.
For example:
Spring Boot ↓Spring ApplicationContext ↓Beans ↓Dependency Injection ↓Your applicationBoot is not replacing Spring.
It is helping you use Spring more efficiently.
36. An Experienced Developer’s Mental Model
A beginner sees:
SpringApplication.run(...)An experienced developer thinks:
Application Startup ↓Environment preparation ↓ApplicationContext ↓Configuration ↓Component scanning ↓Auto-configuration ↓Bean creation ↓Embedded server ↓Application readyA beginner sees:
@GetMapping("/hello")An experienced developer thinks:
HTTP GET ↓Dispatcher infrastructure ↓Request mapping ↓Controller method ↓Return value ↓HTTP responseThat difference in mental models becomes extremely important as applications become larger.
37. Complete First Application
Our minimal application can therefore look like this:
Main class
package com.example.demo;
import org.springframework.boot.SpringApplication;import org.springframework.boot.autoconfigure.SpringBootApplication;
@SpringBootApplicationpublic class DemoApplication {
    public static void main(String[] args) {        SpringApplication.run(DemoApplication.class, args);    }}
Controller
package com.example.demo.controller;
import org.springframework.web.bind.annotation.GetMapping;import org.springframework.web.bind.annotation.RestController;
@RestControllerpublic class HelloController {
    @GetMapping("/hello")    public String hello() {        return "Hello Spring Boot";    }}
Configuration
server.port=8080Run
./mvnw spring-boot:runTest
curl http://localhost:8080/helloResponse
Hello Spring BootThat’s our first working Spring Boot application.
38. The Complete Picture
We started with an empty project.
Now we have:
                  SPRING BOOT APPLICATION
Developer    │    ▼Spring Initializr    │    ▼Maven Project    │    ├── pom.xml    ├── src/main/java    ├── src/main/resources    └── src/test/java    │    ▼Starter Dependencies    │    ▼@SpringBootApplication    │    ├── Component Scanning    ├── Auto-Configuration    └── Application Configuration    │    ▼ApplicationContext    │    ▼Embedded Web Server    │    ▼@RestController    │    ▼GET /hello    │    ▼"Hello Spring Boot"
What looks like a small application is actually demonstrating many of the Spring Boot concepts we have discussed throughout this series.
39. What We Have Learned
After creating this first application, you should now understand more than just how to run a command.
You should understand:
- How Spring Initializr helps bootstrap a project
- Why Maven is used
- What the generated project structure represents
- Why package hierarchy matters
- What
@SpringBootApplicationbrings together - How component scanning discovers application components
- How a REST controller is created
- How starter dependencies support application capabilities
- How auto-configuration participates in application startup
- How the embedded server allows the application to run independently
- How external configuration changes runtime behavior
- How DevTools can improve local development
- How the application can be packaged as an executable JAR
- How the application can be run using
java -jar
Final Takeaway
Creating a Spring Boot application may look surprisingly simple:
SpringApplication.run(DemoApplication.class, args);But the simplicity is intentional.
Behind that small entry point, Spring Boot coordinates configuration, dependency management, component discovery, auto-configuration, application startup, and web-server integration.
The real objective is not:
“Write less Java code.”
It is:
“Reduce repetitive infrastructure work so developers can concentrate on application behavior.”
And that connects everything we have discussed so far:
Starter Dependencies ↓Get the required libraries ↓Auto-Configuration ↓Configure common infrastructure ↓Embedded Server ↓Run the application ↓DevTools ↓Develop faster ↓External Configuration ↓Adapt to environments ↓Actuator ↓Understand application healthThis is the foundation.
From the next stage onward, we can start adding real application layers—Controller → Service → Repository → Database—and see how Spring Boot manages those components using Dependency Injection and the Application Context.